The same operation in different printing environments, there will often be "acclimatized" symptoms; when we encounter such symptoms, if we do not adjust the ideas in time, do not properly adjust the details of the operation, it is difficult to ensure that the print operation goes smoothly . In order to fully enjoy the wonderful print, the following “fine-tuning†some of the printing operations that are difficult to be carried out according to the conventional thinking, to ensure that we can successfully obtain the printing effect we need!
1, paper definition, and another doorway
With the gradual improvement of computer performance, the computer operating system has also transitioned from the previous Windows 98 to Windows XP. At present, most personal computers are installed with the Windows XP operating system. In the past when printing materials on the Windows 98 system, the system will provide a customized set of printing paper custom settings, but in the Windows XP system we searched through all the "corners" of the system, may not find the print paper since Define options so that when we print certificates, print large text, or print other special materials on the system, we feel very inconvenient. So, in the Windows XP operating system, there is no way to define the type or size of the printed paper as it should be? Now this article will recommend a move to everyone, so that everyone can set the print paper:
First click the "Start" button in the system desktop, and then select "Settings", "Printers and Faxes" item in the pop-up "Start" menu, open the local system's printer list window, click in the window "File" menu item, execute the "Server Properties" command from the pop-up drop-down menu, enter the print server property setting interface;
Click the "Format" tab in the settings interface, in the tab page shown in Figure 1, select the "Create a new format" option, and then enter the new format of the paper to be created in the "Format Name" text box The name, for example, the author assumes that the name entered here is "1010";
Next, in the "format description" setting item, set the "unit" parameter to "metric", which is what we often say centimeter; then in the "paper size" setting item, set the width size to "25.40", The height dimension is also set to “25.40â€, and the “Save Format†button is clicked at the end. Then the new format of our customized paper is successfully saved; when we need to use the new format to print text material, we will You can open the printer properties settings window first, and then you can find the new paper format option to print special documents.
2, eliminate pits, and another trick
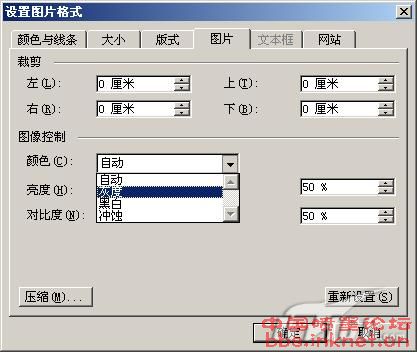
At present, many office users use Word XP applications to edit text materials. After all, Word XP applications are powerful and easy to use. However, when we try to insert an image in the Word XP editing window and use the dot matrix printer to print the document material, we will find that when the white part of the illustration is printed by the dot matrix printer, there will always be some pits. It is clear that these pits will directly affect the final print output. So are there any ways to eliminate the pits in the white area of ​​the illustration and have a clear, realistic printing effect? In fact, there are many ways to eliminate printing pits. Here I would like to recommend several, you can choose any method to eliminate printed pits.
The first method is to use the built-in image editing function of the Word XP application to convert the image inserted into the target document into a grayscale image so that we can target the image before printing it. The white area in the illustration is filtered out, then the pin printer will not appear pitting when printing gray tone images (since the output from the dot matrix printer itself is a grayscale image). When converting the image in the target document to a grayscale image, you can start the Word XP application and open the target document content. Then click the “Insert†menu item in the document editing window, and then the pop-up menu will pop up. Click "Photo" / "From File" command, and insert the image into the specified position of the target document; next double-click the target illustration, and in the subsequent image setting window, click "Image" Label, and in the label page shown in Figure 2, click on the "Image Control" setting color drop-down button, select the "grayscale" item from the pop-up drop-down list, and then click "OK" button, In this way, the target illustration can be automatically turned into a grayscale image. When the dot matrix printer prints the grayscale image in the target document, there is no occurrence of pitting.
The second method is to directly modify the printer's attribute parameters to select the black printing mode or the gray printing mode so that the color illustrations in the target document can be directly printed as a gray-tone image; when this method is used to cancel the print pits, In the Word XP application interface, click the "File" menu item, execute the "Print" command from the subsequent drop-down menu, enter the print parameter setting window of the target document; in the "Printer Name" drop-down window Select the printer of the specified model in the list (set this parameter when installing multiple printers on the same computer), then click the "Properties" button to the right of "Printer Name", and then on the "Advanced" tab page, The output format of the target document is set to the "Black and White Fax" method. Finally, click the "OK" button, which can also cancel the print pits in the target document.
The third method is to use some professional image processing software to convert the target illustration into a black and white two-color image in advance, and then insert the image into the target document for printing, so as to avoid printing the dots in the illustration. Out. For example, with the normal ACDSee viewing tool, we can easily convert the target illustration into a black-and-white two-color image; when converting the image, we only need to first insert the image content in the image editing interface. Select it, right-click it, execute the "Convert" command from the shortcut menu that appears, and then in the corresponding settings window, convert the target image into a TIF file, and set the compression format of the file to CCITT Group3, this way, the ACDSee viewing tool can turn the target image into black and white. After that, we insert the image into the Word XP program file to print, which can effectively prevent the pits from being printed out.
3, disable sharing, and another
In order to effectively control printing costs and prevent the illegal use of shared printers, many users have restricted access to shared printers by enabling firewalls. However, many users who are familiar with the firewall configuration simply re-enter the firewall parameter configuration interface and cancel the restrictions on file and printer sharing parameters, and they can continue to access the shared printer. In fact, as long as we subtly modify the system's group policy to prevent ordinary users from arbitrarily modifying the file and printer sharing parameters of the firewall, then the firewall can always restrict users from randomly accessing the shared printer. The following is the specific method to modify the system group policy. Steps:
Related images on this topic are as follows:
First, execute the "Start"/"Run" menu command in the Windows system desktop, enter the local system running text box, execute the string command "gpedit.msc", and open the system group policy editing window;
In the left list area of ​​the edit window, find the "Computer Configuration" item and expand the "Administrative Templates"/"Network"/"Network Connection"/"Windows Firewall"/"Standard Configuration File" with the mouse below the item. Subkeys, and then in the right list area corresponding to the "standard configuration file" sub-item, double-click the "Windows Firewall: Allow File and Printer Sharing Exceptions" option to open the attribute settings dialog box shown in Figure 3;
In this dialog box, look at the "Windows Firewall: Allow file and printer sharing exceptions" item is not set to "enabled" at this time, if it has been set, then we must reset the item to "disabled" â€, and click “OK†button, and finally restart the computer system, so that any ordinary user will enter the firewall parameter configuration interface in the future, it can not cancel the restrictions on the file and printer sharing parameters of the firewall, in that case Firewalls can easily prohibit ordinary users from accessing shared printers.
4, print speed, another shortcut
Careful print users may find this phenomenon: When the printer prints documents in PDF or DOC format, the print speed does not always print other types of documents faster; The printer will automatically generate a lot of EMF type temporary files in the computer system when processing PDF or DOC format files. The presence of these temporary files directly affects the printing task in the print queue to be delayed printing, so we will obviously Feel the printer is slower than normal when printing PDF or DOC format documents. In fact, as long as we follow the following steps to print, we can prevent the printer from automatically generating a large number of temporary files in the system. This will ensure that the print job is sent directly to the printer for processing:
First, click the "Start" button in the system desktop, and then select "Settings", "Printers and Faxes" menu options in the pop-up "Start" menu, open the local system's printer list window;
In the settings window, find the specific model printer that needs to process the print job, right-click the printer icon, execute the “Properties†command from the pop-up shortcut menu, and enter the property setting interface of the target printer;
Click on the "Advanced" tab in the settings interface, and then in the pop-up tab shown in Figure 4 on the label settings page, select the "Print directly to the printer" item, and click the "OK" button, then the printer will be in the future EMF type temporary files will not be generated automatically in the computer system. Instead, the target print job will be processed directly. In this case, the print speed will be significantly improved. Of course, this printing method is suitable for those printers with higher configuration performance, and when using this method to print materials, we try not to run other applications at the same time during the printing process.
Reprinted from: China Inkjet Forum
Plush Toy ,Big Stuffed Animal,Cute Plushies,Cute Stuffed Animals
Ningbo Shinegifts Import&Export Co., Ltd. , https://www.shinegifts.com