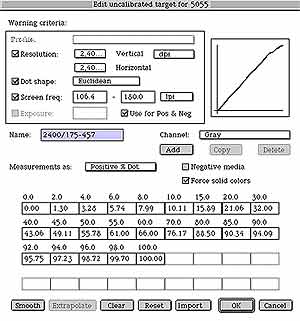
In this interface, “Resolution†indicates the required accuracy, which is consistent with the accuracy of the previous page setup. "Vertical" table vertical direction, "Horizontal" table horizontal direction, there is no special requirement for the same accuracy in both directions. "Dot shape" table dot shape, this selection must also be consistent with the previous page settings. The number of screen lines corresponding to the accuracy of the “Screen freq†table is generally 1200dpi for 75-100lpi, 2400dpi for 106.4-180lpi, and 3000dpi for 120-205lpi. When the accuracy of 3000 dpi needs to output a line number of 100 lpi, it is different from the linear data used in the line number described above, and it needs to be done by itself. The “Use for Pos & Neg†table applies this linearized data to both negative and positive films. Although this item was selected, it has been mentioned in actual use that the same linearized data cannot be used for negative films. "Name" is to name this linearized data. The naming principle is: Do not use Chinese as much as possible; the name should be easy to identify and easy to understand. It can be so named: Accuracy - dot shape - film brand, such as AGFA film, 2400dpi round square point of linearization data can be named: 2400-Eud-AGFA. The "Channel" table outputs monochrome or four-color, simply select "Gray". The “Measurements as†table appears as a negative or positive film when measuring. Usually, “Positive% Dot†is selected as the positive dot. "Negative media table uses negative film, this item will only be used when doing linear adjustment of negative film. "Force Solid Colors" select this item to use this linearized data for spot color.
The values ​​from 0.0 to 100.0 that appear below these menus correspond to the percentage of dots in the linearization test strip from 0% to 100%, and the percentages of the actual dots measured in the linearization test strip are entered in the box below. In the bottom row of buttons on the interface, "Smooth" is sleek. After adjusting the curve, press this button to make the dot compensation more sleek (press the button after all the data is input); "Clear" will be The input value is cleared; "Reset" is reset; "import" is input (this item is basically not used).
After this interface is set up, press “OK†to exit the interface as shown in Figure 4, and return to the interface as shown in Figure 3. In dialog box 1, the linearized data just named is displayed. In the box, the "Name" table linearizes the data name; the "Resolution" table linearizes the precision of the data; the "Dot" table linearizes the dot shape of the data; and the "Freq" table linearizes the number of data controlled lines; “Whether the linearized data of the table is selected for both yin and yang tablets; “Status†indicates whether the linearized data has been adjusted and used, the “D†table has not been adjusted for this linearized data, and the linearized data of the “E†table has been Being adjusted, the linearized data of the "U" table has been adjusted and used. After the check is correct, click "OK" to complete the linearization data setting and exit the interface shown in FIG. At this point you need to check the linearization data you have made. Then open the interface as shown in Figure 2, select the accuracy of the previous, this time need to select the output calibrated curve (Print calibrated target), photosetter output linearization test strip (the upper line of text becomes "Calibrated Target for device '5055': Calibrated†table This linearized test strip has been adjusted). The densitometer is used to measure the percentage of outlet dots output. The error between the actual measurement value and the displayed value of each column of the linearization test strip is between 1% and 2%.
In the interface shown in Figure 3, "Edit from uncalibrated target" indicates that the editor has not adjusted the curve, and "Edit from calibrated target" indicates that the editor has adjusted the curve. The choice of these two items corresponds to whether the linearized test strips are calibrated or not. When the linearization correction is performed for the first time, select “Print uncalibrated target†in the interface shown in Fig. 2. After outputting the linearized test strip, click “Edit†in the interface shown in Fig. 3. From uncalibrated target; if you select "Print calibrated target" again when outputting, linearize the output of the test strip, if the dot percentage is actually measured with the linearization test strip Each column shows a large amount of error and you need to click "Edit from calibrated target" to edit the data again. Click "Edit from calibrated target" and the interface shown in Figure 4 is the same as the one shown in Figure 4. The editing method is the same as the method described above. Enter the measured data into the box and click "Smooth". New Zealand will complete the re-editing work.
Then repeat the above work until you are satisfied. In general, HQ RIP only needs to edit “Edit from uncalibrated target†once, and “Edit from calibrated target†once can get good linearized data.
In addition, when changing different brands of film, you need to start from the output of the uncorrected curve. When you replace the developer solution or turn on the linear adjustment curve every day, you only need to start from the output calibration curve. The HQ-310 RIP linearization adjustment is basically the same as that of the HQ-510 RIP, and can be done by referring to the above steps and interfaces.
Source: China Design Printing Network
False eyelashes are a kind of beauty products. Many fashionable ladies like to beautify their eyes with false eyelashes, so as to make their eyes more attractive. The package of false eyelashes needs to highlight the characteristics of the product, so the packaging box will fit to the size of eyelash , so generally box is small and exquisite, also it has the function of display. The most common type of box are book box and Lid And Base Box. There is a plastic tray holding false eyelashes.

Eyelash Printing Box
Magnetic Boxes For Eyelashes,Color Eyelash Packaging Box,Eyelash Cardboard Box,Custom Eyelash Packing Box
Huizhou Cailang Printing Products Co.,Ltd. , http://www.paperboxs.nl